Installation
The plugin must be uploaded to your WordPress website in the ZIP file format delivered to you when it was purchased.
Step 1: Log in to your WordPress website
To log in to your WordPress dashboard, you need to go to your website’s URL and add “/wp-admin” to the end of it. For example, if your website’s URL is “www.example.com,” you would go to “www.example.com/wp-admin” to log in. Enter your username and password, and you should be taken to the WordPress dashboard. From here, you can manage your website, including installing new plugins.
Step 2: Go to “Plugins” and click on “Add New”
Once you have logged into your WordPress dashboard, navigate to the “Plugins” section, which is typically located in the left-side menu. Click on the “Add New” button to access the plugin installation page. This page allows you to search for, upload, and install new plugins to enhance your website’s functionality. By clicking on “Add New,” you are ready to install a new plugin from a ZIP file.
Step 3: Click on the “Upload Plugin” button
Clicking this button reveals a file upload form that allows you to choose what plugin file from your local computer to upload onto the WordPress site. Navigate to the location of your local plugin file and select it within the file explorer window. Click the “Select” button to accept the file for upload.

Step 4: Click “Choose File” and select the ZIP file to install
Navigate to the location of your local plugin file and select it within the file explorer window. You will only be able to choose files that are in the ZIP file format as this is the expected format for any plugin being added to the website.
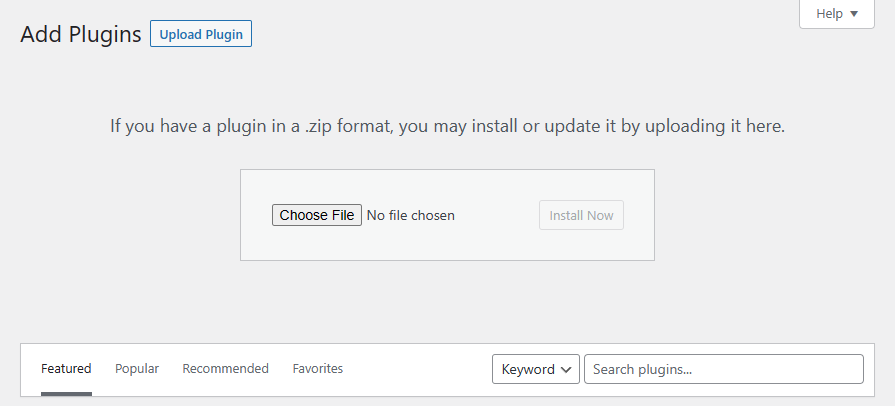
Step 5: After selecting the file, click on the “Install Now” button
The file explorer window will close and you will be taken back to the file upload form within your website. If this is the correct plugin file you should click the “Install Now” button to begin uploading the file from your local computer onto the WordPress website.
Step 6: Wait for the installation to complete
Depending on the size of the file, speed of your internet connection, and server response you may need to wait a short time before the plugin has completed its initial installation.
Once the plugin is installed, you can activate it and start using it on your site. Keep in mind that this plugin requires additional setup via licensing.